Unity כיצד ליצור בקרות מגע לנייד
בקרות הן אחד החלקים החשובים ביותר של משחק וידאו, ולא מפתיע, זה מה שמאפשר לשחקנים לקיים אינטראקציה עם עולם המשחק.
פקדי משחק הם אותות הנשלחים באמצעות אינטראקציה עם חומרה (עכבר/מקלדת, בקר, מסך מגע וכו') אשר לאחר מכן מעובדים על ידי קוד המשחק, תוך יישום פעולות מסוימות.
למחשבי PC ו-קונסולות משחקים יש כפתורים פיזיים שניתן ללחוץ עליהם, עם זאת, למכשירים ניידים מודרניים יש רק כמה כפתורים פיזיים, שאר האינטראקציה מתבצעת באמצעות תנועות מגע, מה שאומר שכפתורי המשחק צריכים להיות מוצגים על המסך. לכן כשיוצרים משחק נייד, חשוב למצוא איזון בין הצגת כל הכפתורים על המסך תוך שמירה על ידידותיות למשתמש וללא עומס.
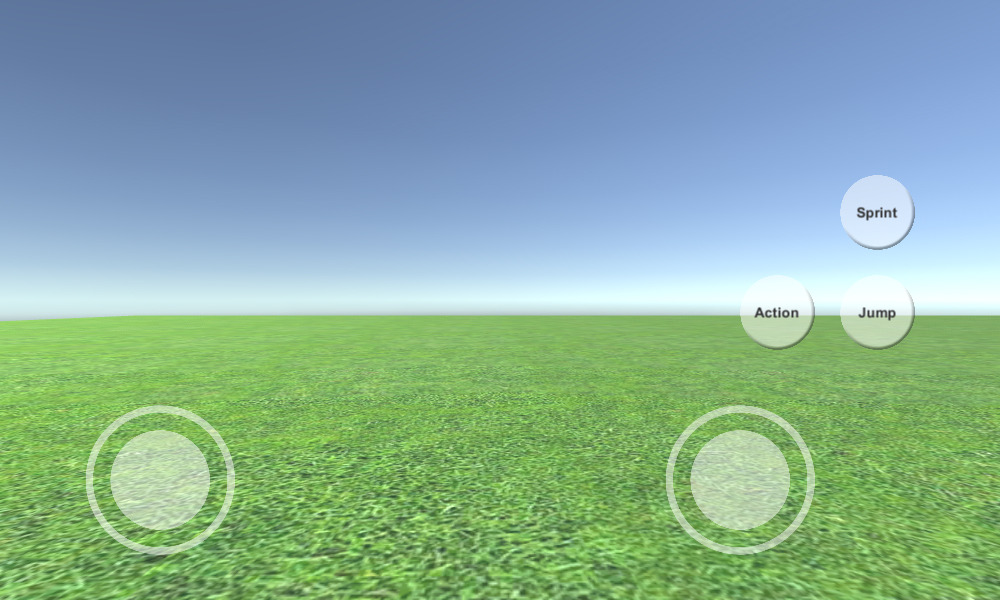
במדריך זה, אני אראה כיצד ליצור בקרות ניידות עם תכונות מלאות (ג'ויסטיקים וכפתורים) בUnity באמצעות UI Canvas.
שלב 1: צור את כל הסקריפטים הדרושים
מדריך זה כולל 2 סקריפטים, SC_ClickTracker.cs ו-SC_MobileControls.cs. הסקריפט הראשון יקשיב לאירועי הקליק והתסריט השני יקרא את הערכים שנוצרו מהאירועים.
SC_ClickTracker.cs
using System.Collections;
using System.Collections.Generic;
using UnityEngine;
using UnityEngine.EventSystems;

#if UNITY_EDITOR
using UnityEditor;
#endif

public class SC_ClickTracker : MonoBehaviour, IPointerDownHandler, IDragHandler, IPointerUpHandler
{
    public string buttonName = ""; //This should be an unique name of the button
    public bool isJoystick = false;
    public float movementLimit = 1; //How far the joystick can be moved (n x Joystick Width)
    public float movementThreshold = 0.1f; //Minimum distance (n x Joystick Width) that the Joystick need to be moved to trigger inputAxis (Must be less than movementLimit)

    //Reference variables
    RectTransform rt;
    Vector3 startPos;
    Vector2 clickPos;

    //Input variables
    Vector2 inputAxis = Vector2.zero;
    bool holding = false;
    bool clicked = false;

    void Start()
    {
        //Add this button to the list
        SC_MobileControls.instance.AddButton(this);

        rt = GetComponent<RectTransform>();
        startPos = rt.anchoredPosition3D;
    }

    //Do this when the mouse is clicked over the selectable object this script is attached to.
    public void OnPointerDown(PointerEventData eventData)
    {
        //Debug.Log(this.gameObject.name + " Was Clicked.");

        holding = true;

        if (!isJoystick)
        {
            clicked = true;
            StartCoroutine(StopClickEvent());
        }
        else
        {
            //Initialize Joystick movement
            clickPos = eventData.pressPosition;
        }
    }

    WaitForEndOfFrame waitForEndOfFrame = new WaitForEndOfFrame();

    //Wait for next update then release the click event
    IEnumerator StopClickEvent()
    {
        yield return waitForEndOfFrame;

        clicked = false;
    }

    //Joystick movement
    public void OnDrag(PointerEventData eventData)
    {
        //Debug.Log(this.gameObject.name + " The element is being dragged");

        if (isJoystick)
        {
            Vector3 movementVector = Vector3.ClampMagnitude((eventData.position - clickPos) / SC_MobileControls.instance.canvas.scaleFactor, (rt.sizeDelta.x * movementLimit) + (rt.sizeDelta.x * movementThreshold));
            Vector3 movePos = startPos + movementVector;
            rt.anchoredPosition = movePos;

            //Update inputAxis
            float inputX = 0;
            float inputY = 0;
            if (Mathf.Abs(movementVector.x) > rt.sizeDelta.x * movementThreshold)
            {
                inputX = (movementVector.x - (rt.sizeDelta.x * movementThreshold * (movementVector.x > 0 ? 1 : -1))) / (rt.sizeDelta.x * movementLimit);
            }
            if (Mathf.Abs(movementVector.y) > rt.sizeDelta.x * movementThreshold)
            {
                inputY = (movementVector.y - (rt.sizeDelta.x * movementThreshold * (movementVector.y > 0 ? 1 : -1))) / (rt.sizeDelta.x * movementLimit);
            }
            inputAxis = new Vector2(inputX, inputY);
        }
    }

    //Do this when the mouse click on this selectable UI object is released.
    public void OnPointerUp(PointerEventData eventData)
    {
        //Debug.Log(this.gameObject.name + " The mouse click was released");

        holding = false;

        if (isJoystick)
        {
            //Reset Joystick position
            rt.anchoredPosition = startPos;
            inputAxis = Vector2.zero;
        }
    }

    public Vector2 GetInputAxis()
    {
        return inputAxis;
    }

    public bool GetClickedStatus()
    {
        return clicked;
    }

    public bool GetHoldStatus()
    {
        return holding;
    }
}

#if UNITY_EDITOR
//Custom Editor
[CustomEditor(typeof(SC_ClickTracker))]
public class SC_ClickTracker_Editor : Editor
{
    public override void OnInspectorGUI()
    {
        SC_ClickTracker script = (SC_ClickTracker)target;

        script.buttonName = EditorGUILayout.TextField("Button Name", script.buttonName);
        script.isJoystick = EditorGUILayout.Toggle("Is Joystick", script.isJoystick);
        if (script.isJoystick)
        {
            script.movementLimit = EditorGUILayout.FloatField("Movement Limit", script.movementLimit);
            script.movementThreshold = EditorGUILayout.FloatField("Movement Threshold", script.movementThreshold);
        }
    }
}
#endif
SC_MobileControls.cs
using System.Collections;
using System.Collections.Generic;
using UnityEngine;

public class SC_MobileControls : MonoBehaviour
{
    [HideInInspector]
    public Canvas canvas;
    List<SC_ClickTracker> buttons = new List<SC_ClickTracker>();

    public static SC_MobileControls instance;

    void Awake()
    {
        //Assign this script to static variable, so it can be accessed from other scripts. Make sure there is only one SC_MobileControls in the Scene.
        instance = this;

        canvas = GetComponent<Canvas>();
    }

    public int AddButton(SC_ClickTracker button)
    {
        buttons.Add(button);

        return buttons.Count - 1;
    }

    public Vector2 GetJoystick(string joystickName)
    {
        for(int i = 0; i < buttons.Count; i++)
        {
            if(buttons[i].buttonName == joystickName)
            {
                return buttons[i].GetInputAxis();
            }
        }

        Debug.LogError("Joystick with a name '" + joystickName + "' not found. Make sure SC_ClickTracker is assigned to the button and the name is matching.");

        return Vector2.zero;
    }

    public bool GetMobileButton(string buttonName)
    {
        for (int i = 0; i < buttons.Count; i++)
        {
            if (buttons[i].buttonName == buttonName)
            {
                return buttons[i].GetHoldStatus();
            }
        }

        Debug.LogError("Button with a name '" + buttonName + "' not found. Make sure SC_ClickTracker is assigned to the button and the name is matching.");

        return false;
    }

    public bool GetMobileButtonDown(string buttonName)
    {
        for (int i = 0; i < buttons.Count; i++)
        {
            if (buttons[i].buttonName == buttonName)
            {
                return buttons[i].GetClickedStatus();
            }
        }

        Debug.LogError("Button with a name '" + buttonName + "' not found. Make sure SC_ClickTracker is assigned to the button and the name is matching.");

        return false;
    }
}
שלב 2: הגדר פקדים ניידים
- צור קנבס חדש (GameObject -> ממשק משתמש -> קנבס)
- שנה את 'UI Scale Mode' ב-Canvas Scaler ל-'Scale With Screen Size' ושנה את רזולוציית הפניה לזו שאיתה אתה עובד (במקרה שלי זה 1000 x 600)
- צרף את הסקריפט SC_MobileControls ל-Canvas Object
- לחץ לחיצה ימנית על Canvas Object -> UI -> Image
- שנה את שם התמונה החדשה שנוצרה ל "JoystickLeft"
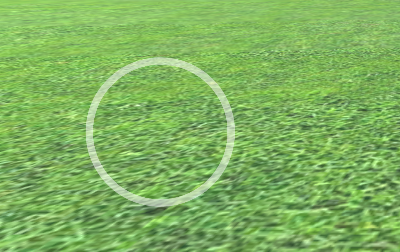
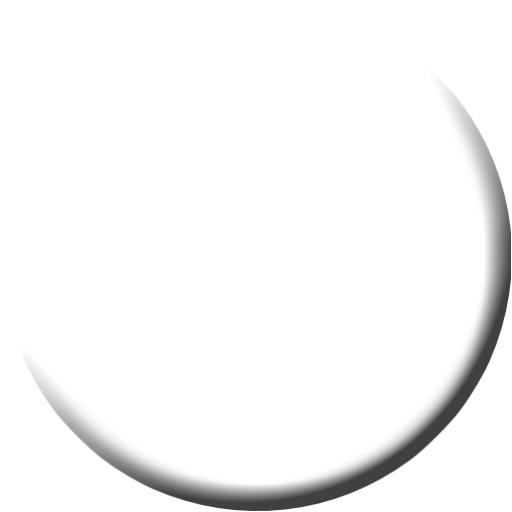
- שנה את "JoystickLeft" ספרייט לעיגול ריק (אל תשכח לשנות את סוג הטקסטורה ל-'Sprite (2D and UI)' לאחר הייבוא ל-Unity)
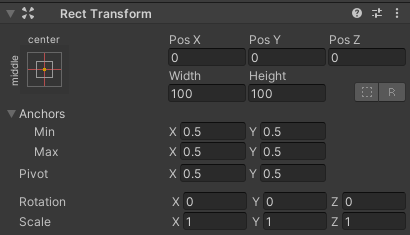
- הגדר את ערכי "JoystickLeft" שינוי צורה זהה לזה של צילום מסך למטה:
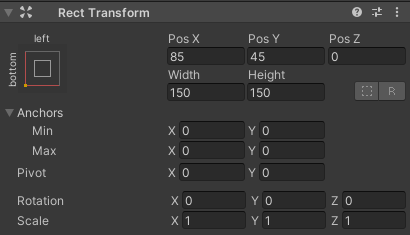
- ברכיב Image, הגדר את Color alpha ל-0.5 כדי להפוך את הספרייט שקוף מעט:
- שכפל את האובייקט "JoystickLeft" ושנה את שמו ל "JoystickLeftButton"
- העבר "JoystickLeftButton" בתוך האובייקט "JoystickLeft"
- שנה את הספרייט "JoystickLeftButton" לעיגול מלא:

- הגדר את ערכי "JoystickLeftButton" טרנספורמציה ישרה כמו בצילום המסך למטה:
- הוסף רכיב לחצן ל "JoystickLeftButton"
- ברכיב הלחצן שנה מעבר ל 'None'
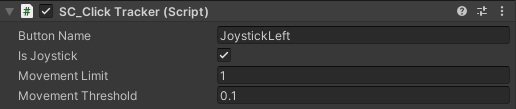
- צרף את הסקריפט SC_ClickTracker ל "JoystickLeftButton"
- ב-SC_ClickTracker הגדר את שם הכפתור לכל שם ייחודי (במקרה שלי הגדרתי אותו ל-'JoystickLeft') והפעל את תיבת הסימון 'Is Joystick'.
כפתור הג'ויסטיק מוכן. אתה יכול לקבל כל מספר של ג'ויסטיקים (במקרה שלי יהיו לי 2, אחד משמאל לשליטה בתנועה ואחד מימין לשליטה בסיבוב).
- שכפל "JoystickLeft" ושנה את שמו ל "JoystickRight"
- הרחב את "JoystickRight" ושנה את השם של "JoystickLeftButton" ל "JoystickRightButton"
- הגדר את ערכי "JoystickRight" טרנספורמציה ישרה כמו בצילום המסך למטה:

- בחר את האובייקט "JoystickRightButton" וב-SC_ClickTracker שנה את שם הלחצן ל 'JoystickRight'
הג'ויסטיק השני מוכן.
עכשיו בואו ניצור כפתור רגיל:
- לחץ לחיצה ימנית על Canvas Object -> UI -> כפתור
- שנה את שם אובייקט הלחצן ל "SprintButton"
- שנה את "SprintButton" ספרייט למעגל עם אפקט שיפוע:
- הגדר את ערכי "SprintButton" טרנספורמציה ישרה כמו בצילום המסך למטה:
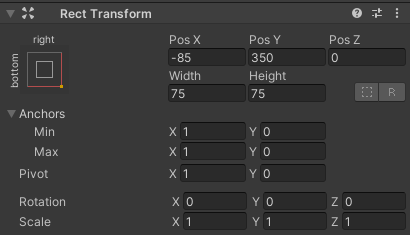
- שנה את צבע התמונה "SprintButton" אלפא ל-0.5
- צרף את הסקריפט SC_ClickTracker לאובייקט "SprintButton"
- ב-SC_ClickTracker שנה את שם הלחצן ל 'Sprinting'
- בחר אובייקט טקסט בתוך "SprintButton" ושנה את הטקסט שלו ל-'Sprint', שנה גם את גודל גופן ל 'Bold'
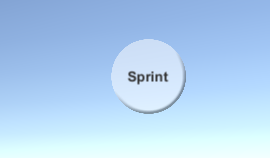
הכפתור מוכן.
אנחנו הולכים ליצור כפתור נוסף בשם "Jump":
- שכפל את האובייקט "SprintButton" ושנה את שמו ל "JumpButton"
- שנה את ערך "JumpButton" Pos Y ל-250
- ב-SC_ClickTracker שנה את שם הלחצן ל 'Jumping'
- שנה את הטקסט בתוך "JumpButton" ל 'Jump'
והלחצן האחרון הוא "Action":
- שכפל את האובייקט "JumpButton" ושנה את שמו ל "ActionButton"
- שנה את ערך "ActionButton" Pos X ל-185
- ב-SC_ClickTracker שנה את שם הלחצן ל 'Action'
- שנה את הטקסט בתוך "ActionButton" ל 'Action'
שלב 3: הטמעת בקרות ניידות
אם ביצעת את השלבים שלמעלה, כעת תוכל להשתמש בפונקציות האלה כדי ליישם את הפקדים הניידים בסקריפט שלך:
if(SC_MobileControls.instance.GetMobileButtonDown("BUTTON_NAME")){
	//Mobile button has been pressed one time, equivalent to if(Input.GetKeyDown(KeyCode...))
}

if(SC_MobileControls.instance.GetMobileButton("BUTTON_NAME")){
	//Mobile button is being held pressed, equivalent to if(Input.GetKey(KeyCode...))
}

//Get normalized direction of a on-screen Joystick
//Could be compared to: new Vector2(Input.GetAxis("Horizontal"), Input.GetAxis("Vertical")) or new Vector2(Input.GetAxis("Mouse X"), Input.GetAxis("Mouse Y"))
Vector2 inputAxis = SC_MobileControls.instance.GetJoystick("JOYSTICK_NAME");
כדוגמה, אני אממש בקרות ניידות עם בקר FPS מ-מדריך זה. לך תחילה עקוב אחר המדריך הזה, זה די פשוט.
אם הייתם עוקבים אחר המדריך הזה היה לכם עכשיו את האובייקט "FPSPlayer" יחד עם Canvas עם פקדים ניידים.
אנו נשמר את פקדי שולחן העבודה תוך הטמעת הפקדים הניידים, מה שהופך אותו לרוחב פלטפורמות:
- פתח את סקריפט SC_FPSController, גלול עד שורה 28, והסר חלק זה (הסרת החלק הזה תמנע נעילת הסמן ותאפשר לחיצה על פקדים ניידים בעורך).
        // Lock cursor
        Cursor.lockState = CursorLockMode.Locked;
Cursor.visible = false;- גלול עד שורה 39 והחלף:
        bool isRunning = Input.GetKey(KeyCode.LeftShift);
        float curSpeedX = canMove ? (isRunning ? runningSpeed : walkingSpeed) * Input.GetAxis("Vertical") : 0;
float curSpeedY = canMove ? (isRunning ? runningSpeed : walkingSpeed) * Input.GetAxis("Horizontal") : 0;- עם:
        bool isRunning = Input.GetKey(KeyCode.LeftShift) || SC_MobileControls.instance.GetMobileButton("Sprinting");
        float curSpeedX = canMove ? (isRunning ? runningSpeed : walkingSpeed) * (Input.GetAxis("Vertical") + SC_MobileControls.instance.GetJoystick("JoystickLeft").y) : 0;
float curSpeedY = canMove ? (isRunning ? runningSpeed : walkingSpeed) * (Input.GetAxis("Horizontal") + SC_MobileControls.instance.GetJoystick("JoystickLeft").x) : 0;- גלול מטה עד שורה 45 והחלף:
if (Input.GetButton("Jump") && canMove && characterController.isGrounded)- עם:
if ((Input.GetButton("Jump") || SC_MobileControls.instance.GetMobileButtonDown("Jumping")) && canMove && characterController.isGrounded)- גלול מטה עד שורה 68 והחלף:
            rotationX += -Input.GetAxis("Mouse Y") * lookSpeed;
            rotationX = Mathf.Clamp(rotationX, -lookXLimit, lookXLimit);
            playerCamera.transform.localRotation = Quaternion.Euler(rotationX, 0, 0);
transform.rotation *= Quaternion.Euler(0, Input.GetAxis("Mouse X") * lookSpeed, 0);- עם:
#if UNITY_IPHONE || UNITY_ANDROID || UNITY_EDITOR
            rotationX += -(SC_MobileControls.instance.GetJoystick("JoystickRight").y) * lookSpeed;
#else
            rotationX += -Input.GetAxis("Mouse Y") * lookSpeed;
#endif
            rotationX = Mathf.Clamp(rotationX, -lookXLimit, lookXLimit);
            playerCamera.transform.localRotation = Quaternion.Euler(rotationX, 0, 0);
#if UNITY_IPHONE || UNITY_ANDROID || UNITY_EDITOR
            transform.rotation *= Quaternion.Euler(0, SC_MobileControls.instance.GetJoystick("JoystickRight").x * lookSpeed, 0);
#else
            transform.rotation *= Quaternion.Euler(0, Input.GetAxis("Mouse X") * lookSpeed, 0);
#endif
מכיוון שתנועת המראה תפריע לבדיקת הג'ויסטיק בעורך, אנו משתמשים ב-#if עבור קומפילציה ספציפית לפלטפורמה כדי להפריד את ההיגיון הנייד משאר הפלטפורמות.
בקר FPS הנייד מוכן כעת, בואו נבדוק אותו:

כפי שאתה יכול לראות, כל הג'ויסטיקים והלחצנים פונקציונליים (למעט כפתור "Action", שלא יושם בגלל שאין לו תכונה מתאימה).