מדריך למתחילים של Photon Network (קלאסי).
Photon Network הוא שירות עבור Unity המאפשר למפתחים ליצור משחקים מרובי משתתפים בזמן אמת.
הוא מספק API חזק וקל לשימוש שהופך אותו למושלם אפילו למפתחים מתחילים.
בפוסט זה, נעבור על הורדת הקבצים הדרושים, הגדרת Photon AppID ותכנות דוגמה פשוטה של מרובה משתתפים.
חלק 1: הגדרת רשת פוטון
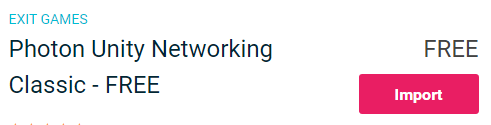
השלב הראשון הוא להוריד את חבילת Photon Network מה-Asset Store. הוא מכיל את כל התסריטים והקבצים הדרושים לשילוב מרובה משתתפים.
- פתח את הפרויקט Unity שלך ואז עבור אל ה-Asset Store: (חלון -> כללי -> AssetStore) או הקש Ctrl+9
- חפש "Photon Unity Networking Classic - Free" ולאחר מכן לחץ על התוצאה הראשונה או לחץ כאן
- ייבא את חבילת Photon לאחר סיום ההורדה

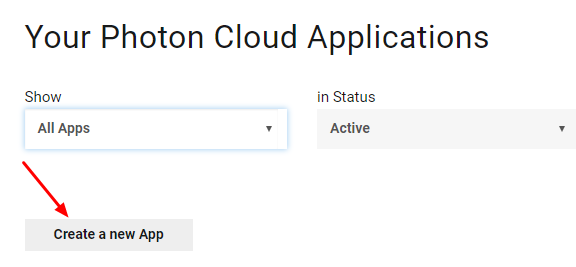
- לאחר ייבוא החבילה עליך ליצור מזהה אפליקציית Photon, זה נעשה באתר האינטרנט שלהם: https://www.photonengine.com/
- צור חשבון חדש (או היכנס לחשבון הקיים שלך)
- עבור לדף היישומים על ידי לחיצה על סמל הפרופיל ולאחר מכן על "Your Applications" או עקוב אחר הקישור הזה: https://dashboard.photonengine.com/en-US/PublicCloud
- בדף יישומים לחץ "Create new app"
- בדף היצירה, עבור סוג פוטון בחר "Photon Realtime" ועבור השם, הקלד כל שם ולאחר מכן לחץ על "Create"
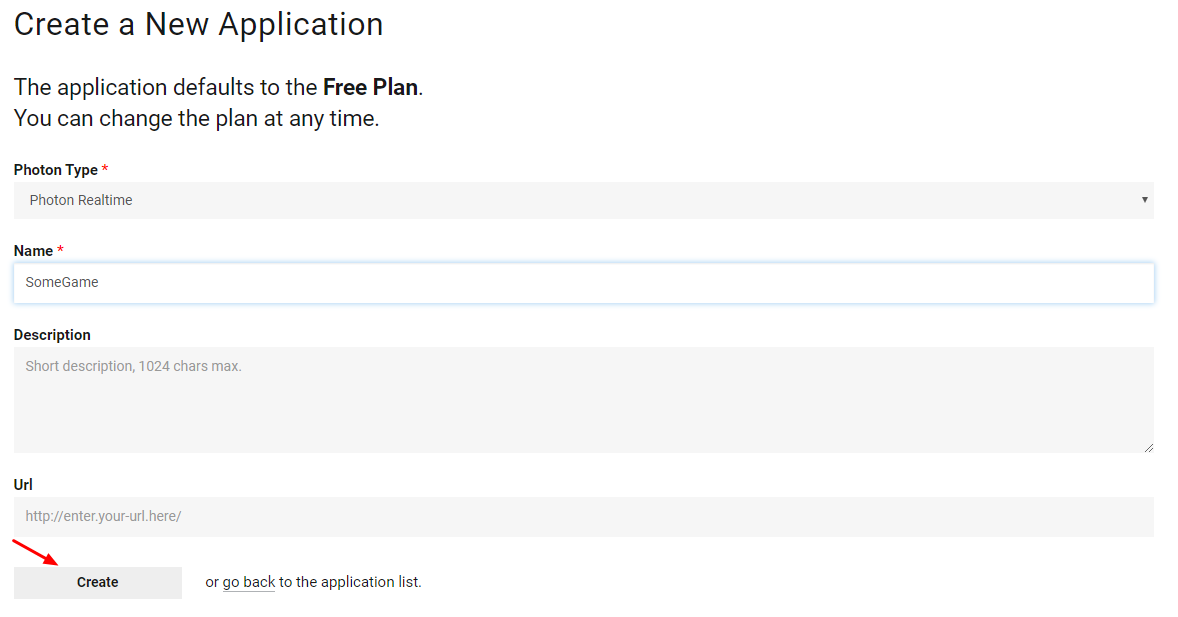
כפי שאתה יכול לראות, היישום כברירת מחדל לתוכנית החינמית. תוכל לקרוא עוד על תוכניות תמחור כאן
- לאחר יצירת האפליקציה, העתק את מזהה האפליקציה שנמצא מתחת לשם האפליקציה

- חזור לפרויקט Unity שלך ואז עבור אל חלון -> פוטון Unity רשת -> אשף PUN
- באשף PUN לחץ על "Setup Project", הדבק את מזהה האפליקציה שלך ולאחר מכן לחץ "Setup Project"
- רשת הפוטון מוכנה כעת
חלק 2: יצירת משחק מרובה משתתפים
כעת נעבור לחלק בו אנו יוצרים למעשה משחק מרובה משתתפים.
הדרך שבה מתנהל מרובה משתתפים בפוטון היא:
- ראשית, אנו מתחברים לאזור הפוטון (לדוגמה, מזרח ארה"ב, אירופה, אסיה וכו') אשר ידוע גם בשם לובי.
- ברגע שנכנסים ללובי, אנו מבקשים את כל החדרים שנוצרו באזור, ואז נוכל להצטרף לאחד מהחדרים או ליצור חדר משלנו.
- לאחר שהצטרפנו לחדר אנו מבקשים רשימה של השחקנים המחוברים לחדר ומציגים את מופעי ה-Player שלהם, אשר לאחר מכן מסונכרנים עם המופעים המקומיים שלהם באמצעות PhotonView.
- כאשר מישהו עוזב את החדר, המופע שלו מושמד והוא מוסר מרשימת השחקנים.
1. הקמת לובי
נתחיל ביצירת MainMenu שיכיל היגיון לובי (גלישה בחדרים קיימים, יצירת חדרים חדשים וכו').
- צור סצנה חדשה וקרא לה "MainMenu"
- צור סקריפט C# חדש וקרא לו GameLobby
- בסצנת MainMenu צור GameObject חדש. קרא לזה "_GameLobby" וצרף אליו את הסקריפט של GameLobby
כעת פתח את הסקריפט של GameLobby.
ראשית, בואו ניצור את כל המשתנים הדרושים:
    //Our player name
    string playerName = "Player 1";
    //This client's version number. Users are separated from each other by gameversion (which allows you to make breaking changes).
    string gameVersion = "0.9";
    //The list of created rooms
    RoomInfo[] createdRooms = new RoomInfo[0];
    //Use this name when creating a Room
    string roomName = "Room 1";
    Vector2 roomListScroll = Vector2.zero;
    bool joiningRoom = false;
הדבר הבא שעלינו לעשות הוא לאפשר הצטרפות אוטומטית ללובי ולובי סטטיסטיקות, זה יאפשר לנו לקבל את רשימת החדרים. זה נעשה ב-Void Start().
כמו כן, אנו מפעילים אוטומטית SyncScene כך שהסצנה תסונכרן אוטומטית ברגע שאנו מצטרפים לחדר.
ולבסוף, אנו קוראים PhotonNetwork.ConnectUsingSettings כדי להתחבר.
    // Use this for initialization
    void Start()
    {
        //Automatically join Lobby after we connect to Photon Region
        PhotonNetwork.PhotonServerSettings.JoinLobby = true;
        //Enable Lobby Stats to receive the list of Created rooms
        PhotonNetwork.PhotonServerSettings.EnableLobbyStatistics = true;
        //This makes sure we can use PhotonNetwork.LoadLevel() on the master client and all clients in the same room sync their level automatically
        PhotonNetwork.automaticallySyncScene = true;

        if (!PhotonNetwork.connected)
        {
            // Connect to the photon master-server. We use the settings saved in PhotonServerSettings (a .asset file in this project)
            PhotonNetwork.ConnectUsingSettings(gameVersion);
        }
    }
כדי לדעת אם החיבור ל-Photon Cloud הצליח, עלינו ליישם את 2 ההתקשרויות הבאות: OnReceivedRoomListUpdate() ו-OnFailedToConnectToPhoton(פרמטרי אובייקט).
    void OnFailedToConnectToPhoton(object parameters)
    {
        Debug.Log("OnFailedToConnectToPhoton. StatusCode: " + parameters + " ServerAddress: " + PhotonNetwork.ServerAddress);
        //Try to connect again
        PhotonNetwork.ConnectUsingSettings(gameVersion);
    }

    void OnReceivedRoomListUpdate()
    {
        Debug.Log("We have received the Room list");
        //After this callback, PhotonNetwork.GetRoomList() becomes available
        createdRooms = PhotonNetwork.GetRoomList();
    }
הבא הוא החלק של ממשק המשתמש, שבו מתבצעות הגלישה בחדר ויצירת החדר:
ולבסוף אנו מיישמים עוד 4 התקשרויות חוזרות: OnPhotonCreateRoomFailed(), OnPhotonJoinRoomFailed(אובייקט[] סיבה), OnCreatedRoom() ו-OnJoinedRoom().
התקשרויות חוזרות אלו משמשות כדי לקבוע אם הצטרפנו/יצרנו את החדר או אם היו בעיות כלשהן במהלך החיבור.
    void OnPhotonCreateRoomFailed()
    {
        Debug.Log("OnPhotonCreateRoomFailed got called. This can happen if the room exists (even if not visible). Try another room name.");
        joiningRoom = false;
    }

    void OnPhotonJoinRoomFailed(object[] cause)
    {
        Debug.Log("OnPhotonJoinRoomFailed got called. This can happen if the room is not existing or full or closed.");
        joiningRoom = false;
    }

    void OnCreatedRoom()
    {
        Debug.Log("OnCreatedRoom");
        //Set our player name
        PhotonNetwork.playerName = playerName;
        //Load the Scene called GameLevel (Make sure it's added to build settings)
        PhotonNetwork.LoadLevel("GameLevel");
    }

    void OnJoinedRoom()
    {
        Debug.Log("OnJoinedRoom");
    }
והנה הסקריפט האחרון של GameLobby.cs:
using System.Collections;
using System.Collections.Generic;
using UnityEngine;
public class GameLobby : MonoBehaviour
{
//Our player name
string playerName = "Player 1";
//This client's version number. Users are separated from each other by gameversion (which allows you to make breaking changes).
string gameVersion = "0.9";
//The list of created rooms
RoomInfo[] createdRooms = new RoomInfo[0];
//Use this name when creating a Room
string roomName = "Room 1";
Vector2 roomListScroll = Vector2.zero;
bool joiningRoom = false;
// Use this for initialization
void Start()
{
//Automatically join Lobby after we connect to Photon Region
PhotonNetwork.PhotonServerSettings.JoinLobby = true;
//Enable Lobby Stats to receive the list of Created rooms
PhotonNetwork.PhotonServerSettings.EnableLobbyStatistics = true;
//This makes sure we can use PhotonNetwork.LoadLevel() on the master client and all clients in the same room sync their level automatically
PhotonNetwork.automaticallySyncScene = true;
if (!PhotonNetwork.connected)
{
// Connect to the photon master-server. We use the settings saved in PhotonServerSettings (a .asset file in this project)
PhotonNetwork.ConnectUsingSettings(gameVersion);
}
}
void OnFailedToConnectToPhoton(object parameters)
{
Debug.Log("OnFailedToConnectToPhoton. StatusCode: " + parameters + " ServerAddress: " + PhotonNetwork.ServerAddress);
//Try to connect again
PhotonNetwork.ConnectUsingSettings(gameVersion);
}
void OnReceivedRoomListUpdate()
{
Debug.Log("We have received the Room list");
//After this callback, PhotonNetwork.GetRoomList() becomes available
createdRooms = PhotonNetwork.GetRoomList();
}
void OnGUI()
{
GUI.Window(0, new Rect(Screen.width/2 - 450, Screen.height/2 - 200, 900, 400), LobbyWindow, "Lobby");
}
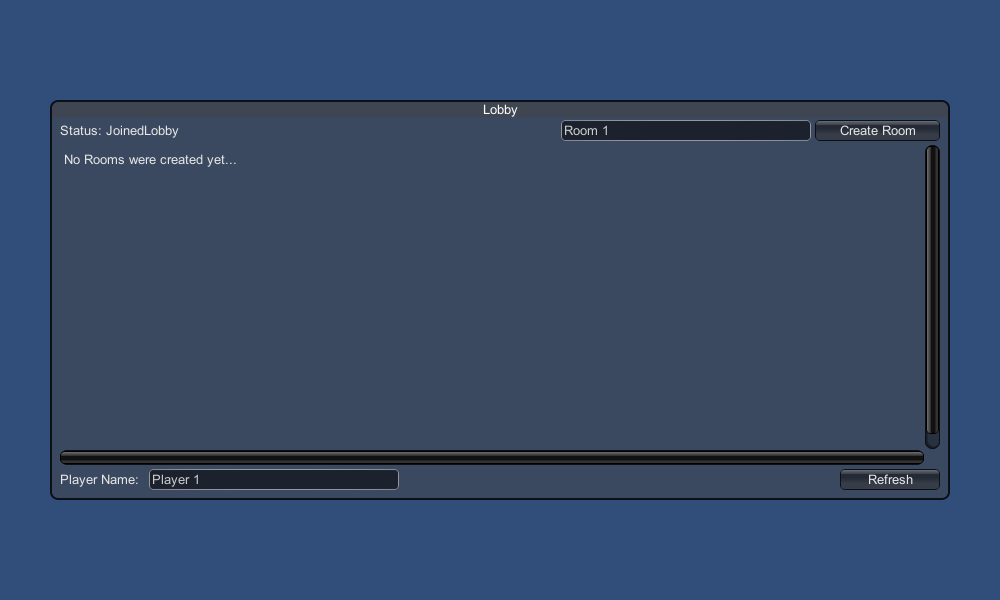
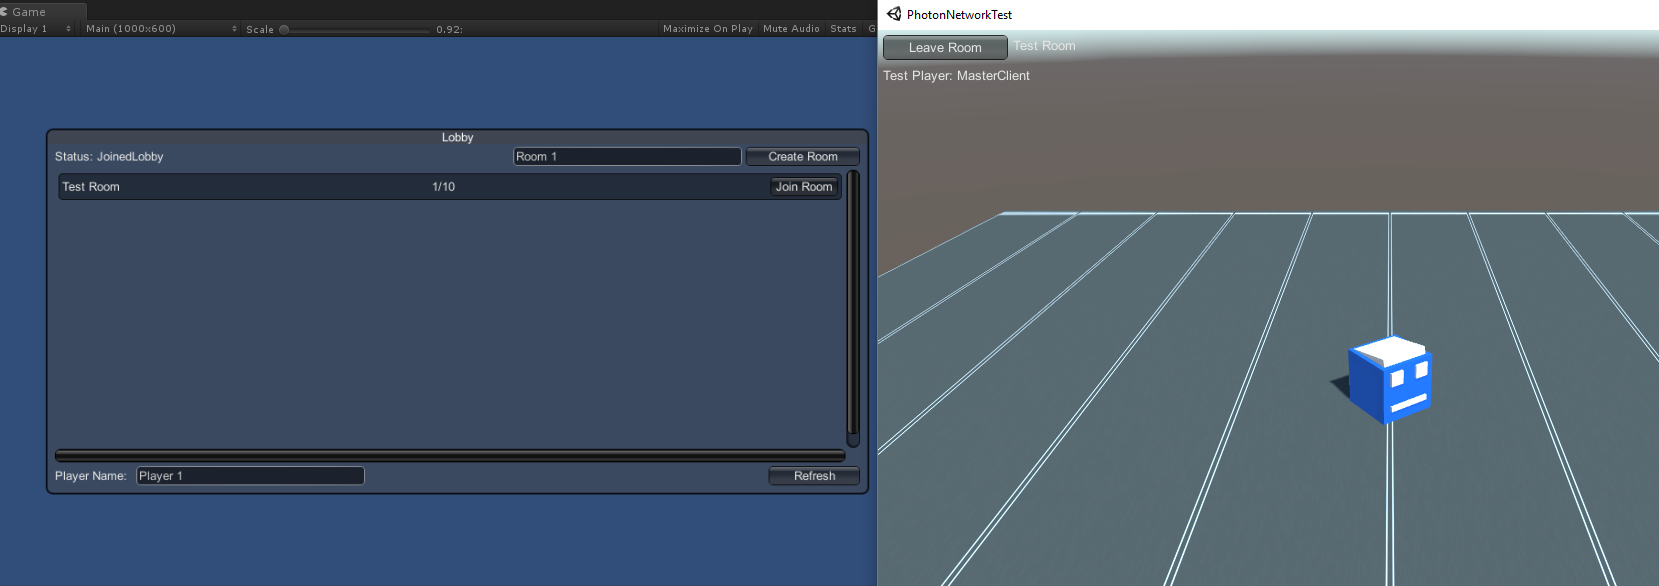
void LobbyWindow(int index)
{
//Connection Status and Room creation Button
GUILayout.BeginHorizontal();
GUILayout.Label("Status: " + PhotonNetwork.connectionStateDetailed);
if(joiningRoom || !PhotonNetwork.connected)
{
GUI.enabled = false;
}
GUILayout.FlexibleSpace();
//Room name text field
roomName = GUILayout.TextField(roomName, GUILayout.Width(250));
if (GUILayout.Button("Create Room", GUILayout.Width(125)))
{
if (roomName != "")
{
joiningRoom = true;
RoomOptions roomOptions = new RoomOptions();
roomOptions.IsOpen = true;
roomOptions.IsVisible = true;
roomOptions.MaxPlayers = (byte)10; //Set any number
PhotonNetwork.JoinOrCreateRoom(roomName, roomOptions, TypedLobby.Default);
}
}
GUILayout.EndHorizontal();
//Scroll through available rooms
roomListScroll = GUILayout.BeginScrollView(roomListScroll, true, true);
if(createdRooms.Length == 0)
{
GUILayout.Label("No Rooms were created yet...");
}
else
{
for(int i = 0; i < createdRooms.Length; i++)
{
GUILayout.BeginHorizontal("box");
GUILayout.Label(createdRooms[i].Name, GUILayout.Width(400));
GUILayout.Label(createdRooms[i].PlayerCount + "/" + createdRooms[i].MaxPlayers);
GUILayout.FlexibleSpace();
if (GUILayout.Button("Join Room"))
{
joiningRoom = true;
//Set our Player name
PhotonNetwork.playerName = playerName;
//Join the Room
PhotonNetwork.JoinRoom(createdRooms[i].Name);
}
GUILayout.EndHorizontal();
}
}
GUILayout.EndScrollView();
//Set player name and Refresh Room button
GUILayout.BeginHorizontal();
GUILayout.Label("Player Name: ", GUILayout.Width(85));
//Player name text field
playerName = GUILayout.TextField(playerName, GUILayout.Width(250));
GUILayout.FlexibleSpace();
GUI.enabled = PhotonNetwork.connectionState != ConnectionState.Connecting && !joiningRoom;
if (GUILayout.Button("Refresh", GUILayout.Width(100)))
{
if (PhotonNetwork.connected)
{
//We are already connected, simply update the Room list
createdRooms = PhotonNetwork.GetRoomList();
}
else
{
//We are not connected, estabilish a new connection
PhotonNetwork.ConnectUsingSettings(gameVersion);
}
}
GUILayout.EndHorizontal();
if (joiningRoom)
{
GUI.enabled = true;
GUI.Label(new Rect(900/2 - 50, 400/2 - 10, 100, 20), "Connecting...");
}
}
void OnPhotonCreateRoomFailed()
{
Debug.Log("OnPhotonCreateRoomFailed got called. This can happen if the room exists (even if not visible). Try another room name.");
joiningRoom = false;
}
void OnPhotonJoinRoomFailed(object[] cause)
{
Debug.Log("OnPhotonJoinRoomFailed got called. This can happen if the room is not existing or full or closed.");
joiningRoom = false;
}
void OnCreatedRoom()
{
Debug.Log("OnCreatedRoom");
//Set our player name
PhotonNetwork.playerName = playerName;
//Load the Scene called GameLevel (Make sure it's added to build settings)
PhotonNetwork.LoadLevel("GameLevel");
}
void OnJoinedRoom()
{
Debug.Log("OnJoinedRoom");
}
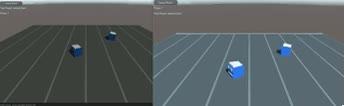
}2. יצירת נגן טרומי
במשחקים מרובי משתתפים, למופע Player יש 2 צדדים: מקומי ומרוחק.
מופע מקומי נשלט באופן מקומי (על ידינו).
מופע מרחוק, לעומת זאת, הוא ייצוג מקומי של מה שהשחקן השני עושה. זה לא אמור להיות מושפע מהקלט שלנו.
כדי לקבוע אם המופע הוא מקומי או מרוחק אנו משתמשים ברכיב PhotonView.
PhotonView פועל כשליח שמקבל ושולח את הערכים שצריך לסנכרן, למשל מיקום וסיבוב.
אז בואו נתחיל ביצירת מופע הנגן (אם כבר יש לכם מופע הנגן מוכן, תוכלו לדלג על שלב זה).
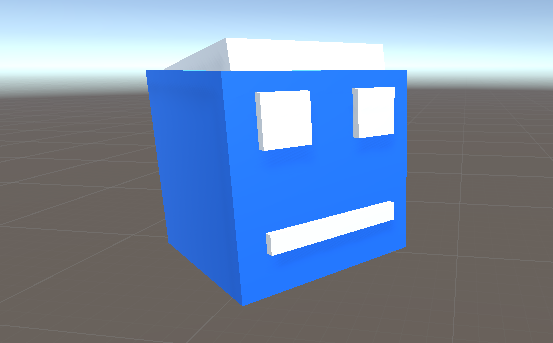
במקרה שלי, המופע של Player יהיה קובייה פשוטה שמוזזת עם מקשי W, ו-S ומסתובבים עם מקשי A ו-D.
והנה תסריט בקר פשוט:
PlayerController.cs
using UnityEngine;

public class PlayerController : MonoBehaviour
{
    // Update is called once per frame
    void Update()
    {
        //Move Front/Back
        if (Input.GetKey(KeyCode.W))
        {
            transform.Translate(transform.forward * Time.deltaTime * 2.45f, Space.World);
        }
        else if (Input.GetKey(KeyCode.S))
        {
            transform.Translate(-transform.forward * Time.deltaTime * 2.45f, Space.World);
        }

        //Rotate Left/Right
        if (Input.GetKey(KeyCode.A))
        {
            transform.Rotate(new Vector3(0, -14, 0) * Time.deltaTime * 4.5f, Space.Self);
        }
        else if (Input.GetKey(KeyCode.D))
        {
            transform.Rotate(new Vector3(0, 14, 0) * Time.deltaTime * 4.5f, Space.Self);
        }
    }
}
השלב הבא הוא הוספת רכיב PhotonView.
- הוסף רכיב PhotonView למופע הנגן
- צור סקריפט C# חדש, קרא לו PlayerNetworkSync ופתח אותו (סקריפט זה ישמש לתקשורת באמצעות PhotonView)
הדבר הראשון שעלינו לעשות הוא להחליף את MonoBehaviour ב-Photon.MonoBehaviour. שלב זה נחוץ כדי להיות מסוגל להשתמש במשתנה photonView המאוחסן במטמון במקום להשתמש ב-GetComponent<PhotonView>().
public class PlayerNetworkSync : Photon.MonoBehaviourלאחר מכן, נוכל לעבור ליצירת כל המשתנים הדרושים:
    //List of the scripts that should only be active for the local player (ex. PlayerController, MouseLook etc.)
    public MonoBehaviour[] localScripts;
    //List of the GameObjects that should only be active for the local player (ex. Camera, AudioListener etc.)
    public GameObject[] localObjects;
    //Values that will be synced over network
    Vector3 latestPos;
    Quaternion latestRot;
לאחר מכן בריק Start() אנו בודקים אם הנגן מקומי או מרוחק באמצעות photonView.isMine:
    // Use this for initialization
    void Start()
    {
        if (photonView.isMine)
        {
            //Player is local
        }
        else
        {
            //Player is Remote
            for(int i = 0; i < localScripts.Length; i++)
            {
                localScripts[i].enabled = false;
            }
            for (int i = 0; i < localObjects.Length; i++)
            {
                localObjects[i].SetActive(false);
            }
        }
    }
הסנכרון בפועל נעשה באמצעות התקשרות חוזרת של PhotonView: OnPhotonSerializeView(זרם PhotonStream, מידע PhotonMessageInfo):
    void OnPhotonSerializeView(PhotonStream stream, PhotonMessageInfo info)
    {
        if (stream.isWriting)
        {
            //We own this player: send the others our data
            stream.SendNext(transform.position);
            stream.SendNext(transform.rotation);
        }
        else
        {
            //Network player, receive data
            latestPos = (Vector3)stream.ReceiveNext();
            latestRot = (Quaternion)stream.ReceiveNext();
        }
    }
במקרה זה, אנו שולחים לשחקן רק מיקום וסיבוב, אבל אתה יכול להשתמש בדוגמה למעלה כדי לשלוח כל ערך שנדרש לסנכרון דרך הרשת, בתדירות גבוהה.
הערכים שהתקבלו מוחלים לאחר מכן בעדכון void():
    // Update is called once per frame
    void Update()
    {
        if (!photonView.isMine)
        {
            //Update remote player (smooth this, this looks good, at the cost of some accuracy)
            transform.position = Vector3.Lerp(transform.position, latestPos, Time.deltaTime * 5);
            transform.rotation = Quaternion.Lerp(transform.rotation, latestRot, Time.deltaTime * 5);
        }
    }
הנה הסקריפט האחרון של PlayerNetworkSync.cs:
using System.Collections;
using System.Collections.Generic;
using UnityEngine;
public class PlayerNetworkSync : Photon.MonoBehaviour
{
//List of the scripts that should only be active for the local player (ex. PlayerController, MouseLook etc.)
public MonoBehaviour[] localScripts;
//List of the GameObjects that should only be active for the local player (ex. Camera, AudioListener etc.)
public GameObject[] localObject;
//Values that will be synced over network
Vector3 latestPos;
Quaternion latestRot;
// Use this for initialization
void Start()
{
if (photonView.isMine)
{
//Player is local
}
else
{
//Player is Remote
for(int i = 0; i < localScripts.Length; i++)
{
localScripts[i].enabled = false;
}
for (int i = 0; i < localObject.Length; i++)
{
localObject[i].SetActive(false);
}
}
}
void OnPhotonSerializeView(PhotonStream stream, PhotonMessageInfo info)
{
if (stream.isWriting)
{
//We own this player: send the others our data
stream.SendNext(transform.position);
stream.SendNext(transform.rotation);
}
else
{
//Network player, receive data
latestPos = (Vector3)stream.ReceiveNext();
latestRot = (Quaternion)stream.ReceiveNext();
}
}
// Update is called once per frame
void Update()
{
if (!photonView.isMine)
{
//Update remote player (smooth this, this looks good, at the cost of some accuracy)
transform.position = Vector3.Lerp(transform.position, latestPos, Time.deltaTime * 5);
transform.rotation = Quaternion.Lerp(transform.rotation, latestRot, Time.deltaTime * 5);
}
}
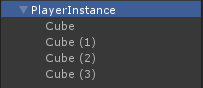
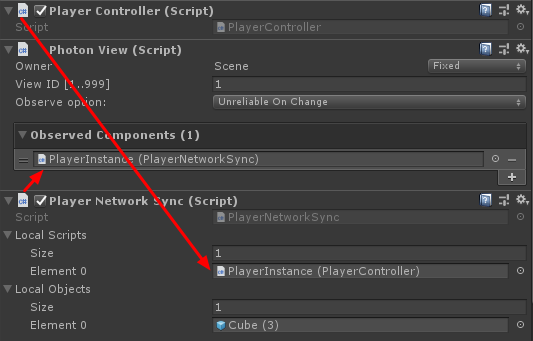
}- הוסף את הסקריפט PlayerNetworkSync.cs ל-PlayerInstance והקצה אותו לרכיבי PhotonView Observed.
- הקצה את ה-PlayerCntroller.cs ל-"Local Scripts" והקצה את ה-GameObjects (שאותם רוצים לנטרל עבור שחקנים מרוחקים) ל- "Local Objects"
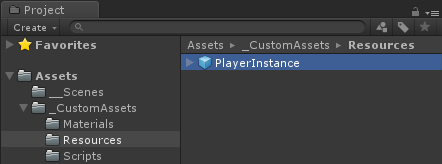
- שמור את PlayerInstance ל-Prefab והעבר אותו לתיקיה שנקראת Resources (אם אין תיקיה כזו, צור אחת). שלב זה נחוץ כדי להיות מסוגל להריץ אובייקטים מרובי משתתפים ברשת.
3. יצירת רמת משחק
GameLevel היא סצנה שנטענת לאחר ההצטרפות לחדר ושם מתרחשת כל האקשן.
- צור סצנה חדשה וקרא לה "GameLevel" (או אם אתה רוצה לשמור שם אחר, הקפד לשנות את השם בשורה זו PhotonNetwork.LoadLevel("GameLevel"); ב-GameLobby.cs).
במקרה שלי, אני אשתמש בסצנה פשוטה עם מטוס:

- כעת צור סקריפט חדש וקרא לו RoomController. הסקריפט הזה יטפל בהיגיון בתוך החדר (כמו השרצת השחקנים, הצגת רשימת השחקנים וכו').
נתחיל בהגדרת המשתנים הדרושים:
    //Player instance prefab, must be located in the Resources folder
    public GameObject playerPrefab;
    //Player spawn point
    public Transform spawnPoint;
כדי להפעיל את הגרסה המוקדמת של הנגן אנו משתמשים ב-PhotonNetwork.Instantiate:
    // Use this for initialization
    void Start()
    {
        //In case we started this demo with the wrong scene being active, simply load the menu scene
        if (!PhotonNetwork.connected)
        {
            UnityEngine.SceneManagement.SceneManager.LoadScene("MainMenu");
            return;
        }

        //We're in a room. spawn a character for the local player. it gets synced by using PhotonNetwork.Instantiate
        PhotonNetwork.Instantiate(playerPrefab.name, spawnPoint.position, Quaternion.identity, 0);
    }
וממשק משתמש פשוט עם לחצן "Leave Room" וכמה אלמנטים נוספים כגון שם החדר ורשימת השחקנים המחוברים:
    void OnGUI()
    {
        if (PhotonNetwork.room == null)
            return;

        //Leave this Room
        if (GUI.Button(new Rect(5, 5, 125, 25), "Leave Room"))
        {
            PhotonNetwork.LeaveRoom();
        }

        //Show the Room name
        GUI.Label(new Rect(135, 5, 200, 25), PhotonNetwork.room.Name);

        //Show the list of the players connected to this Room
        for (int i = 0; i < PhotonNetwork.playerList.Length; i++)
        {
            //Show if this player is a Master Client. There can only be one Master Client per Room so use this to define the authoritative logic etc.)
            string isMasterClient = (PhotonNetwork.playerList[i].IsMasterClient ? ": MasterClient" : "");
            GUI.Label(new Rect(5, 35 + 30 * i, 200, 25), PhotonNetwork.playerList[i].NickName + isMasterClient);
        }
    }
ולבסוף, אנו מיישמים התקשרות חוזרת נוספת של PhotonNetwork בשם OnLeftRoom() שנקראת כשאנחנו עוזבים את החדר:
    void OnLeftRoom()
    {
        //We have left the Room, return to the MainMenu
        UnityEngine.SceneManagement.SceneManager.LoadScene("MainMenu");
    }
והנה הסקריפט האחרון של RoomController.cs:
using UnityEngine;

public class RoomController : MonoBehaviour
{
    //Player instance prefab, must be located in the Resources folder
    public GameObject playerPrefab;
    //Player spawn point
    public Transform spawnPoint;

    // Use this for initialization
    void Start()
    {
        //In case we started this demo with the wrong scene being active, simply load the menu scene
        if (!PhotonNetwork.connected)
        {
            UnityEngine.SceneManagement.SceneManager.LoadScene("MainMenu");
            return;
        }

        //We're in a room. spawn a character for the local player. it gets synced by using PhotonNetwork.Instantiate
        PhotonNetwork.Instantiate(playerPrefab.name, spawnPoint.position, Quaternion.identity, 0);
    }

    void OnGUI()
    {
        if (PhotonNetwork.room == null)
            return;

        //Leave this Room
        if (GUI.Button(new Rect(5, 5, 125, 25), "Leave Room"))
        {
            PhotonNetwork.LeaveRoom();
        }

        //Show the Room name
        GUI.Label(new Rect(135, 5, 200, 25), PhotonNetwork.room.Name);

        //Show the list of the players connected to this Room
        for (int i = 0; i < PhotonNetwork.playerList.Length; i++)
        {
            //Show if this player is a Master Client. There can only be one Master Client per Room so use this to define the authoritative logic etc.)
            string isMasterClient = (PhotonNetwork.playerList[i].IsMasterClient ? ": MasterClient" : "");
            GUI.Label(new Rect(5, 35 + 30 * i, 200, 25), PhotonNetwork.playerList[i].NickName + isMasterClient);
        }
    }

    void OnLeftRoom()
    {
        //We have left the Room, return to the MainMenu
        UnityEngine.SceneManagement.SceneManager.LoadScene("MainMenu");
    }
}- לבסוף, צור GameObject חדש בסצנת GameLevel וקרא לו "_RoomController"
- צרף את הסקריפט של RoomController לאובייקט _RoomController
- הקצה לו את ה-PlayerInstance הקדם ו-SpawnPoint Transform ואז שמור את הסצנה
- הוסף גם MainMenu וגם GameLevel להגדרות ה-Build.

4. ביצוע מבחן Build
עכשיו הגיע הזמן ליצור מבנה ולבדוק אותו:
הכל עובד כמצופה!
מַעֲנָק
RPC
ב-Photon Network, RPC מייצג Remote Procedure Call, הוא משמש לקריאה לפונקציה בלקוחות מרוחקים שנמצאים באותו חדר (תוכל לקרוא עוד על זה כאן ).
ל-RPC שימושים רבים, למשל, נניח שאתה צריך לשלוח הודעת צ'אט לכל השחקנים בחדר. עם RPC, זה קל לעשות.
[PunRPC]
void ChatMessage(string senderName, string messageText)
{
    Debug.Log(string.Format("{0}: {1}", senderName, messageText));
}
שימו לב ל-[PunRPC] לפני הפונקציה. תכונה זו נחוצה אם אתה מתכנן לקרוא לפונקציה באמצעות RPCs.
כדי לקרוא לפונקציות המסומנות כ-RPC, אתה צריך PhotonView. שיחה לדוגמה:
PhotonView photonView = PhotonView.Get(this);
photonView.RPC("ChatMessage", PhotonTargets.All, PhotonNetwork.playerName, "Some message");
טיפ מקצוען: אם הסקריפט שלך הוא Photon.MonoBehaviour או Photon.PunBehaviour, אתה יכול להשתמש ב: this.photonView.RPC().
מאפיינים מותאמים אישית
ברשת Photon, מאפיינים מותאמים אישית הוא Hashtable שניתן להקצות לנגן או לחדר.
זה שימושי כאשר אתה צריך להגדיר נתונים קבועים שאין צורך לשנות לעתים קרובות (למשל שם צוות שחקן, מצב משחק חדר וכו').
ראשית, עליך להגדיר Hashtable, אשר נעשה על ידי הוספת השורה למטה בתחילת הסקריפט:
//Replace default Hashtables with Photon hashtables
using Hashtable = ExitGames.Client.Photon.Hashtable;
הדוגמה שלהלן מגדירה את מאפייני החדר בשם "GameMode" ו-"AnotherProperty":
        //Set Room properties (Only Master Client is allowed to set Room properties)
        if (PhotonNetwork.isMasterClient)
        {
            Hashtable setRoomProperties = new Hashtable();
            setRoomProperties.Add("GameMode", "FFA");
            setRoomProperties.Add("AnotherProperty", "Test");
            PhotonNetwork.room.SetCustomProperties(setRoomProperties);
        }

        //Will print "FFA"
        print((string)PhotonNetwork.room.CustomProperties["GameMode"]);
        //Will print "Test"
        print((string)PhotonNetwork.room.CustomProperties["AnotherProperty"]);
מאפייני הנגן מוגדרים באופן דומה:
        //Set our Player's property
        Hashtable setPlayerProperties = new Hashtable();
        setPlayerProperties.Add("PlayerHP", (float)100);
        PhotonNetwork.player.SetCustomProperties(setPlayerProperties);

        //Will print "100"
        print((float)PhotonNetwork.player.CustomProperties["PlayerHP"]);
כדי להסיר מאפיין ספציפי פשוט הגדר את הערך שלו ל- null.
        //Remove property called "PlayerHP" from Player properties
        Hashtable setPlayerProperties = new Hashtable();
        setPlayerProperties.Add("PlayerHP", null);
        PhotonNetwork.player.SetCustomProperties(setPlayerProperties);