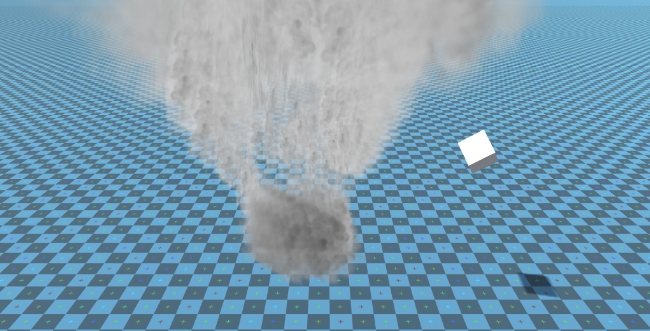
הפוך את הפיזיקה של טורנדו באחדות
במדריך זה, ניצור הדמיית טורנדו בתוך Unity.
Unity גרסה בשימוש במדריך זה: Unity 2018.3.0f2 (64 סיביות)
שלב 1: צור את כל התסריטים הדרושים
מדריך זה דורש 2 סקריפטים:
SC_Caught.cs
//This script is attached automatically to each Object caught in Tornado

using UnityEngine;

public class SC_Caught : MonoBehaviour
{
    private SC_Tornado tornadoReference;
    private SpringJoint spring;
    [HideInInspector]
    public Rigidbody rigid;

    // Use this for initialization
    void Start()
    {
        rigid = GetComponent<Rigidbody>();
    }

    // Update is called once per frame
    void Update()
    {
        //Lift spring so objects are pulled upwards
        Vector3 newPosition = spring.connectedAnchor;
        newPosition.y = transform.position.y;
        spring.connectedAnchor = newPosition;
    }

    void FixedUpdate()
    {
        //Rotate object around tornado center
        Vector3 direction = transform.position - tornadoReference.transform.position;
        //Project
        Vector3 projection = Vector3.ProjectOnPlane(direction, tornadoReference.GetRotationAxis());
        projection.Normalize();
        Vector3 normal = Quaternion.AngleAxis(130, tornadoReference.GetRotationAxis()) * projection;
        normal = Quaternion.AngleAxis(tornadoReference.lift, projection) * normal;
        rigid.AddForce(normal * tornadoReference.GetStrength(), ForceMode.Force);

        Debug.DrawRay(transform.position, normal * 10, Color.red);
    }

    //Call this when tornadoReference already exists
    public void Init(SC_Tornado tornadoRef, Rigidbody tornadoRigidbody, float springForce)
    {
        //Make sure this is enabled (for reentrance)
        enabled = true;

        //Save tornado reference
        tornadoReference = tornadoRef;

        //Initialize the spring
        spring = gameObject.AddComponent<SpringJoint>();
        spring.spring = springForce;
        spring.connectedBody = tornadoRigidbody;

        spring.autoConfigureConnectedAnchor = false;

        //Set initial position of the caught object relative to its position and the tornado
        Vector3 initialPosition = Vector3.zero;
        initialPosition.y = transform.position.y;
        spring.connectedAnchor = initialPosition;
    }

    public void Release()
    {
        enabled = false;
        Destroy(spring);
    }
}
SC_Tornado.cs
//Tornado script controls tornado physics

using System.Collections.Generic;
using UnityEngine;

public class SC_Tornado : MonoBehaviour
{
    [Tooltip("Distance after which the rotation physics starts")]
    public float maxDistance = 20;

    [Tooltip("The axis that the caught objects will rotate around")]
    public Vector3 rotationAxis = new Vector3(0, 1, 0);

    [Tooltip("Angle that is added to the object's velocity (higher lift -> quicker on top)")]
    [Range(0, 90)]
    public float lift = 45;

    [Tooltip("The force that will drive the caught objects around the tornado's center")]
    public float rotationStrength = 50;

    [Tooltip("Tornado pull force")]
    public float tornadoStrength = 2;

    Rigidbody r;

    List<SC_Caught> caughtObject = new List<SC_Caught>();

    // Start is called before the first frame update
    void Start()
    {
        //Normalize the rotation axis given by the user
        rotationAxis.Normalize();

        r = GetComponent<Rigidbody>();
        r.isKinematic = true;
    }

    void FixedUpdate()
    {
        //Apply force to caught objects
        for (int i = 0; i < caughtObject.Count; i++)
        {
            if(caughtObject[i] != null)
            {
                Vector3 pull = transform.position - caughtObject[i].transform.position;
                if (pull.magnitude > maxDistance)
                {
                    caughtObject[i].rigid.AddForce(pull.normalized * pull.magnitude, ForceMode.Force);
                    caughtObject[i].enabled = false;
                }
                else
                {
                    caughtObject[i].enabled = true;
                }
            }
        }
    }

    void OnTriggerEnter(Collider other)
    {
        if (!other.attachedRigidbody) return;
        if (other.attachedRigidbody.isKinematic) return;

        //Add caught object to the list
        SC_Caught caught = other.GetComponent<SC_Caught>();
        if (!caught)
        {
            caught = other.gameObject.AddComponent<SC_Caught>();
        }

        caught.Init(this, r, tornadoStrength);

        if (!caughtObject.Contains(caught))
        {
            caughtObject.Add(caught);
        }
    }

    void OnTriggerExit(Collider other)
    {
        //Release caught object
        SC_Caught caught = other.GetComponent<SC_Caught>();
        if (caught)
        {
            caught.Release();

            if (caughtObject.Contains(caught))
            {
                caughtObject.Remove(caught);
            }
        }
    }

    public float GetStrength()
    {
        return rotationStrength;
    }

    //The axis the caught objects rotate around
    public Vector3 GetRotationAxis()
    {
        return rotationAxis;
    }

    //Draw tornado radius circle in Editor
    void OnDrawGizmosSelected()
    {
        Vector3[] positions = new Vector3[30];
        Vector3 centrePos = transform.position;
        for (int pointNum = 0; pointNum < positions.Length; pointNum++)
        {
            // "i" now represents the progress around the circle from 0-1
            // we multiply by 1.0 to ensure we get a fraction as a result.
            float i = (float)(pointNum * 2) / positions.Length;

            // get the angle for this step (in radians, not degrees)
            float angle = i * Mathf.PI * 2;

            // the X & Y position for this angle are calculated using Sin & Cos
            float x = Mathf.Sin(angle) * maxDistance;
            float z = Mathf.Cos(angle) * maxDistance;

            Vector3 pos = new Vector3(x, 0, z) + centrePos;
            positions[pointNum] = pos;
        }

        Gizmos.color = Color.cyan;
        for (int i = 0; i < positions.Length; i++)
        {
            if (i == positions.Length - 1)
            {
                Gizmos.DrawLine(positions[0], positions[positions.Length - 1]);
            }
            else
            {
                Gizmos.DrawLine(positions[i], positions[i + 1]);
            }
        }
    }
}![]()
שלב 2: יצירת טורנדו
1. צור חלקיקי טורנדו:
- צור GameObject חדש (GameObject -> Create Empty) ושם לו "Tornado"
- צור GameObject אחר ושם לו "Particles", הזז אותו בתוך "Tornado" ושנו את מיקומו ל- (0, 0, 0)
- הוסף רכיב ParticleSystem ל-"Particles" GameObject
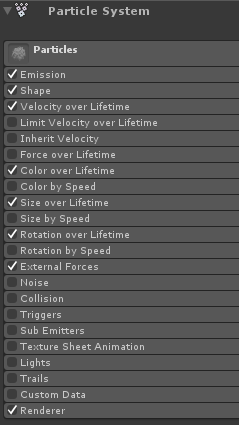
- במערכת החלקיקים אפשר את המודולים הבאים: פליטה, צורה, מהירות לאורך חיים, צבע לאורך חיים, גודל לאורך חיים , סיבוב לאורך החיים, כוחות חיצוניים, מרנדר.
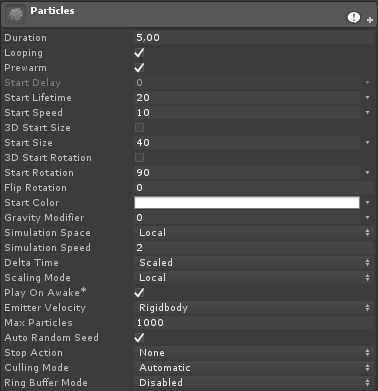
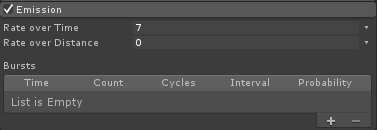
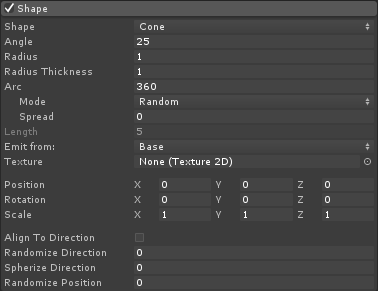
2. הקצה את הערכים עבור כל מודול מערכת חלקיקים (בדוק את צילומי המסך למטה):
מודול ראשי (חלקיקים):
מודול פליטה:
מודול צורה:
מודול מהירות לאורך חיים:

מודול צבע על פני חיים:
![]()
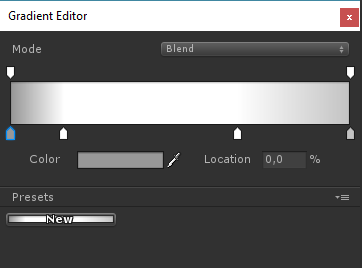
(2 צבעים אפורים בכל קצה ו-2 צבעים לבנים בחלק הפנימי)
מודול גודל לאורך חיים:

(גודל לאורך חיים משתמש בעקומה שנראית כך):
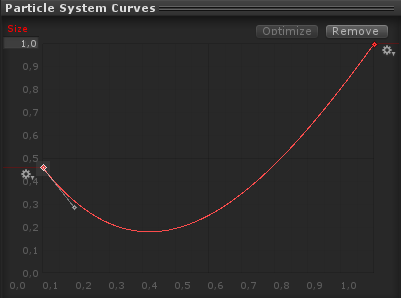
(הגודל יורד מעט ואז עולה)
סיבוב לאורך חיים:
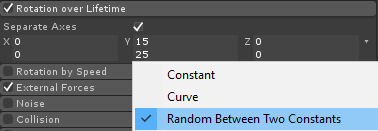
מודול כוחות חיצוניים:
מודול זה אינו זקוק לשינויים, פשוט השאר את ערכי ברירת המחדל.
מודול מעבד:
עבור מודול זה עלינו להקצות רק את החומר הבא:
- צור חומר חדש וקרא לו "tornado_material"
- שנה את ה-Shader שלו ל "Legacy Shaders/Particles/Alpha Blended"
- הקצה לו את המרקם למטה (או לחץ כאן):
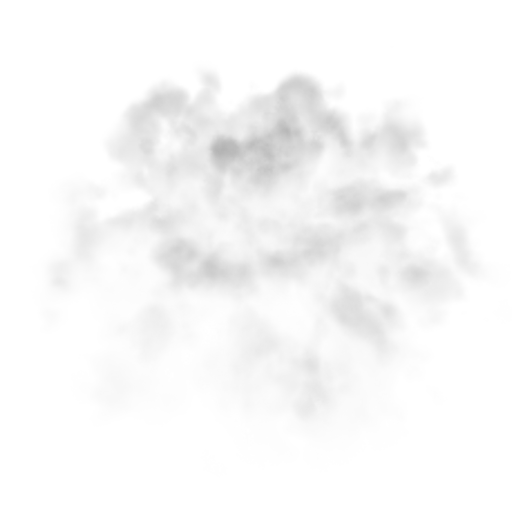
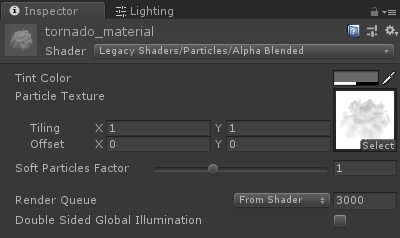
- הקצה את Tornado_material למודול Renderer:

כעת חלקיקי טורנדו צריכים להיראות בערך כך:
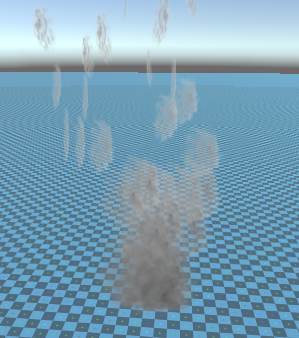
אבל כפי שאתה יכול לראות זה בכלל לא נראה כמו טורנדו, זה בגלל שיש לנו עוד רכיב אחד להוסיף, שהוא שדה כוח מערכת החלקיקים, הרכיב הזה נחוץ כדי לדמות את הרוח המעגלית:
- צור GameObject חדש ושם לו "ForceField"
- העבר "ForceField" בתוך "Tornado" GameObject ושנה את מיקומו ל- (0, 0, 0)

- הוסף רכיב שדה כוח של מערכת החלקיקים ל "ForceField"
- שנה את הערכים של רכיב שדה כוח לאותם כמו בצילום המסך למטה:
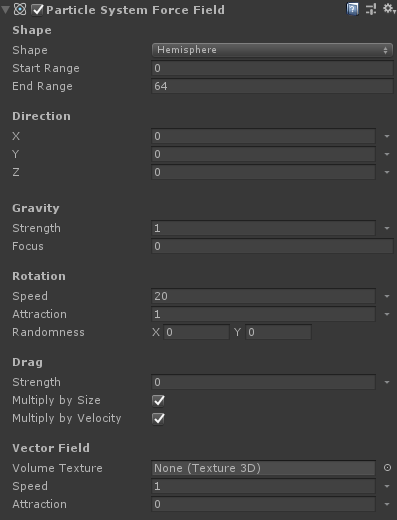
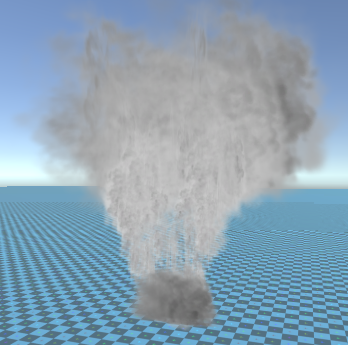
כעת החלקיקים צריכים להיראות בערך כך, וזה הרבה יותר טוב:
3. הגדרת הפיזיקה של טורנדו
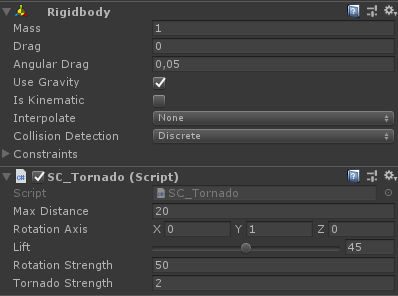
- הוסף רכיבים Rigidbody ו-SC_Tornado ל-"Tornado" GameObject
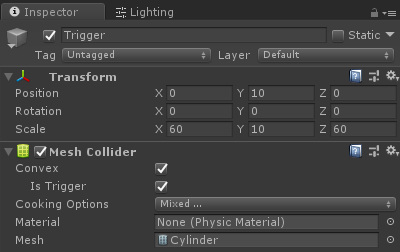
- צור GameObject חדש ושם לו "Trigger"
- העבר "Trigger" בתוך "Tornado" GameObject ושנה את מיקומו ל- (0, 10, 0) ושנה את קנה המידה שלו ל- (60, 10, 60)
- הוסף את רכיב MeshCollider ל-"Trigger" GameObject, סמן את תיבות הסימון Convex ו-IsTrigger, ושנה את ה-Mesh שלו לצילינדר ברירת המחדל
הטורנדו מוכן עכשיו!
כדי לבדוק אותו פשוט צור קובייה והוסף רכיב Rigidbody, ואז הצב אותו בתוך אזור הטריגר.
ברגע שתלחץ על Play, הקובייה אמורה להימשך פנימה על ידי הטורנדו:
